Swaps, Options & Smart Contracts
Learn more about asset swap transactions and how to get started developing smart contracts like options on Liquid.
Here you will find guides and tools to allow you to:
- Perform Liquid asset Swaps.
- Create and manage options contracts.
We'll add to this page as new proof of concepts and production ready tools are released. You'll find examples provided by 3rd parties that are building tools and infrastructure for Liquid as well as releases from Blockstream.
Swaps on Liquid
Overview
A Liquid "swap" is a single transaction that finalizes a trustless exchange of assets between two or more parties. It is much safer than having to trust the other person to complete their part of a traditional two-step exchange after you have completed yours.
The issue with an exchange that happens over more than one transaction is that you may send funds to the other person and they might not send you the asset you want in return. A swap can complete both sides of the exchange, finalizing everything in just one transaction!
A swap on Liquid is done using the Partially Signed Elements Transaction (PSET) standard, whereby the parties involved sign an input and output each and pass around the transaction until all inputs and outputs are accounted for and signed, whereupon the transaction become fully signed and valid for broadcast.
PSET ensures that the transaction is only valid if all signing parties provide the input they signed for and receive the output they require in return. PSET allows a transaction to be passed between parties like this, with each one adding their signatures in sequence until it is complete. This is where the term ‘partially’ comes from; signatures are added to the transaction, leaving it in a ‘partially signed’ state, until it becomes fully signed, and anyone can then broadcast it. Nobody can change the inputs or outputs that have already been signed.
Why use swaps?
Without a swap transaction
Bob wants to buy some of the ‘ABC’ asset. He is prepared to pay 0.1 LBTC for 2 ABC. Alice would like to sell some ABC and agrees with Bob, over an online social group they are both members of, to send him 2 ABC if Bob first sends her 0.1 L-BTC.
Bob is unsure about proceeding with the trade as he is worried that if he sends Alice 0.1 LBTC and they both wait for the transaction to confirm, Alice may not complete her end of the deal and follow up with another transaction in which she sends him the 2 ABC. He would be forced to rely on trusting Alice. This type of multi-transaction exchange is obviously fraught with danger.
With a swap transaction
Bob decides a better solution is needed and hears about an exchange platform that allows for Liquid asset swaps. He knows that, due to the nature of PSET, he and Alice could use any number of ways to propose and complete the swap. They could send the transaction back of forth over email for example, adding signatures and finalizing the transaction as they go, but he prefers to make it available to a wider range of potential traders so that he gets a fair price and decides to use the exchange platform instead.
Bob feels much safer knowing that a swap will remove counter-party risk from his purchase of 2 ABC. With the exchange acting as a coordinator, he creates a PSET with an input of 0.1 LBTC and an output or 2 ABC (the fee is ignored here for simplicity) and signs his input and output. The input and output he wants to trade are now bound to the transaction.
The signed input and output from someone else that needs adding to balance the transaction is currently missing and is required for the transaction to be valid. At this stage the transaction is therefore partially signed.
Bob can now offer this up as an offer for others to take: “provide the input and output needed to make this transaction valid and let’s trade!”. He has become the ‘maker’ and the offer is ready for someone else to become the ‘taker’.
Bob has input 0.1 LBTC from his wallet and the output of 2 ABC is to an address from his wallet and so the inputs and outputs are currently:
| INPUTS | OUTPUT |
|---|---|
| 0.1 LBTC (Bob) | - MISSING |
- MISSING | 2 ABC (Bob) |
Alice is also a user of the exchange and sees Bob’s offer. She decides it is a good deal and that she will take it. She adds an input of 2 ABC that spends from her wallet and an output of 0.1 LBTC to an address from her wallet. She adds her signature to the transaction, making the transaction complete and balanced. The inputs and outputs are now:
| INPUTS | OUTPUTS |
|---|---|
| 0.1 LBTC (Bob) | 0.1. LBTC (Alice) |
| 2 ABC (Alice) | 2 ABC (Bob) |
The transaction is now complete and either Alice, Bob or the exchange can broadcast it (it doesn’t matter which) and see the wallet balances change accordingly.
The swap using PSET has enabled a trustless exchange between the two parties to reach finality in one transaction!
Get inspired
Here's a list of projects using Liquid swaps:
Get started developing
A good place to get started is the Liquid Swap tool which lets you issue and swap your own Liquid asset using elementsregtest.
- Liquid Swap Tool - Python app that uses Elements to perform an asset swap. Liquid Swap tool help docs
This tool is intended to provide a simple standalone desktop app that enables two parties to execute an atomic swap on the Liquid network, namely it allows them to collectively construct a single transaction swapping the selected Issued Assets between the parties.
Swaps - additional resources
- GDK Swap Tests - A Python example test harness for executing 3-step swaps using PSET via wally and GDK.
- Two Step Atomic Swaps - A blog post explaining the technical details of a 2 step swap and using the BEWallet tool to carry out such a swap. An example implementation with an order book is provided in Rust.
- Swap Python example in Elements Core https://github.com/ElementsProject/elements/blob/master/contrib/assets_tutorial/pset_swap_tutorial.py
- Sideswap 3 step swap protocol https://github.com/sideswap-io/sideswapclient/blob/master/doc/protocol.md
- TDEX Swap Protocol https://github.com/tdex-network/dev-portal/tree/master/docs/specs
- GDK support https://gdk.readthedocs.io/en/release_0.0.56/gdk-swap/#liquidex for LiquiDEX v0 in GDK 0.0.56, v1 in GDK 0.0.57
- BEWallet https://github.com/LeoComandini/BEWallet , https://github.com/LeoComandini/BEWallet-cli
Fully collateralized options contracts on Liquid
In the Use Smart Contracts on Liquid to Deploy Financial Products blog post we outlined one example use case for some new Liquid scripting upgrades; fully collateralized options contracts that remove the need for trusted intermediaries.
That blog post detailed the options lifecycle and commonly used terms, so if you aren’t familiar with them we recommend starting there. The purpose of this guide is to share an example implementation of such a smart contract implementation via an RPC “options client” service that runs locally and can be called from a simple web front end or local application.
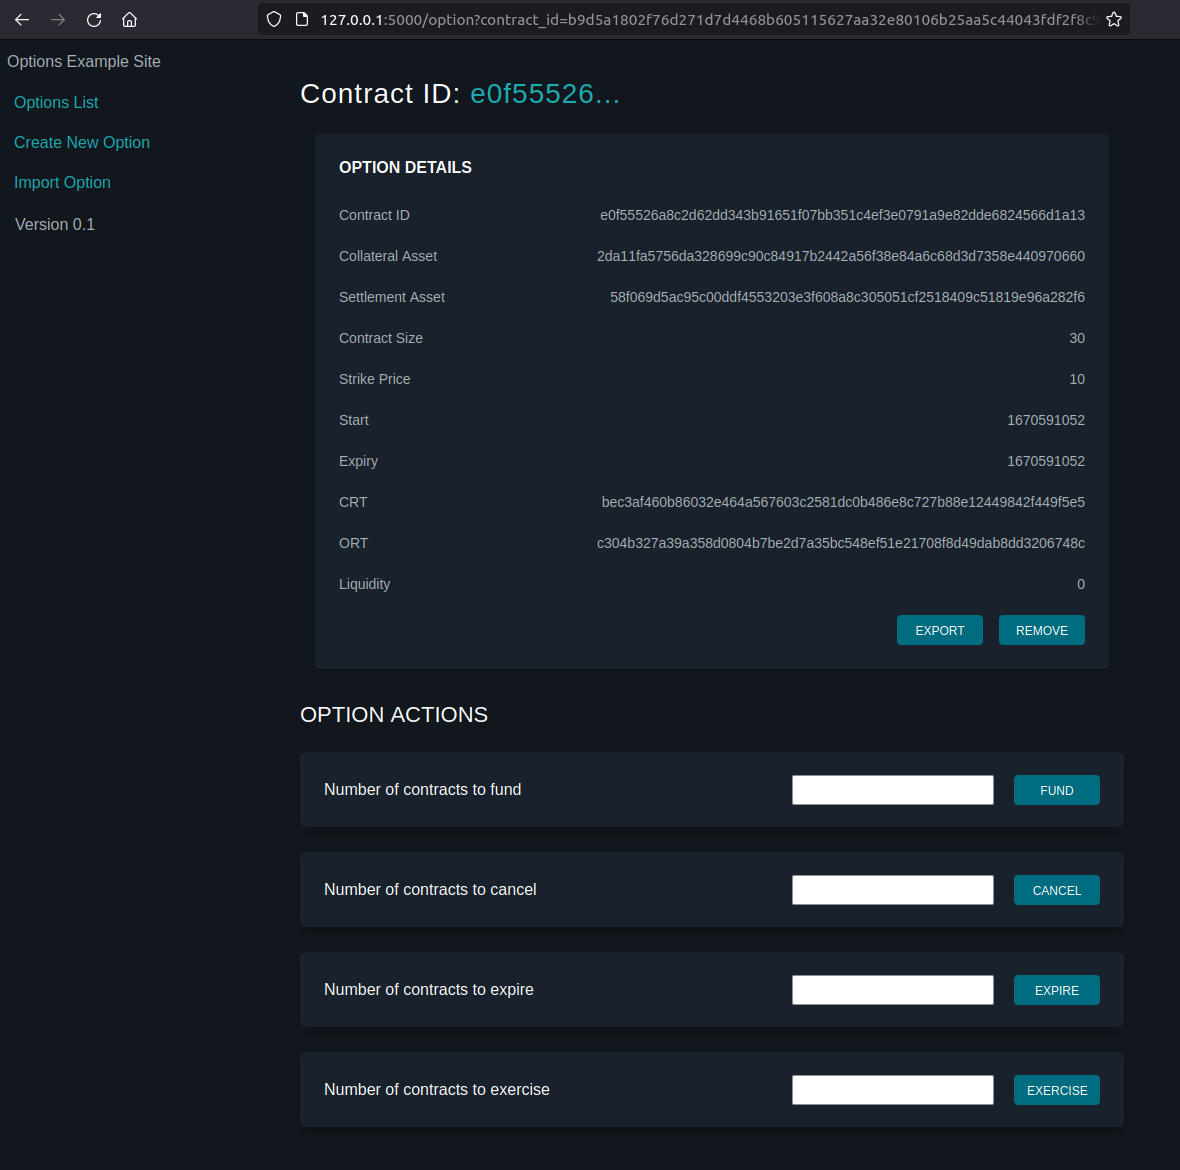
Option details and actions - example web page
The current release of the options client is intended as a proof of concept and we wouldn't recommend using it to power a production options platform just yet; there are known limitations and the code is in active development. If you want to understand the technical details of how the options client works we suggest reading the whitepaper Non-Custodial Options using Elements, coauthored by Allen Piscitello, Sanket Kanjalkar, and Andrew Poelstra.
Installing and running the options client
The options client itself contains the covenant logic, PSET interfaces, handles interactions with Elements, and exposes an RPC interface that enables us to build on top of it without worrying too much what is happening behind the scenes.
Elements
As a prerequisite, you need to be running the current Elements release with RPC access enabled in order for the options client to work. It is advised to use the Liquid testnet config settings in your elements.conf file but with the rpcusername and rpcpassword removed so that on the RPC section only the rpcport is set. You can use either elements-qt or elementsd.
With Elements running, create a default wallet and receive LBTC twice so that your Elements node’s wallet has two UTXOs holding LBTC. Requiring more than one UTXO with LBTC in is a known, current limitation of the options client.
You will also need to issue some assets to use as the collateral and settlement assets. You can do this using the Elements issueasset command, providing an amount and setting the amount of reissuance tokens to zero for each of the two assets you will use. For example, within elements-qt console window:
issueasset 100 0
Wait for the issuance transactions to confirm before you later initialize a contract.
Running the options client with RPC interface
Git clone the repository: https://github.com/sanket1729/options
From the command line, move to the client directory (options/src/client/) and start the service:
cargo run --bin http-serverThe service is now callable over RPC using the format:
http://127.0.0.1:8080/{action}
You can use a tool like postman or curl to check the service is running or try calling it using RPC from your chosen development language (examples are provided later).
Updating new versions of the code
From the command line, move to the options directory (options/) and then:
git pull
cd src/client
cargo run --bin http-server
Resetting your Elements test environment
- Send any remaining LBTC in the wallet back to the faucet.
- Stop the options RPC client.
- Stop Elements (
elements-qtorelementsd). - Delete the
liquidtestnet/options.dbfolder. - Delete the
liquidtestnet/liquidtestnet/settings.jsonfile. - Delete the
liquidtestnet/liquidtestnet/{wallet name}folder. - Start Elements (
elements-qtorelementsd) and create a new default wallet. - Get L-BTC twice from the faucet so you have have two UTXOs with L-BTC in.
- Start the options RPC client (as above).
RPC interface specification
The options client repository lists all the options client RPC commands and shows the JSON formats that should be passed to and that will be returned from the client.
The options client lets you perform the following actions.
- Initialize (create new).
- List locally created and imported contracts.
- View information (assets, strike price etc).
- Fund.
- Cancel.
- Expire.
- Exercise.
- Settle.
- Export, Import, Remove a contract.
For example the info command (view information mentioned above) accepts data in the following JSON format.
{
 "contract_id": "31e864488d2c5c8d481a36166490d2631f559b31955e431aaf9766285e4f7fd7"
}
And returns data in the following format.
{
 "contract_id": "31e864488d2c5c8d481a36166490d2631f559b31955e431aaf9766285e4f7fd7",
 "coll_asset": "4a75e0dffa7c677e3b18e5570f146cc8cffb201a4fac0e9f7e17ec3cb9082934",
 "settle_asset": "dca9f967e1cb9f82367f03663dde5e0150ed9b70a32e5aeed787997c7295b2e1",
 "contract_size": 10,
 "strike_price": 100,
 "expiry": 1669717401,
 "start": 1669717401,
 "crt": "e79c4ac397c87ff63f9072827f49dcf474ffb1e4b7214312457c84310f0907bb",
 "ort": "08f4387697479cb687a508f4858d54b1278987e3abf655e9780c0ee33e5f577f",
 "liquidity": 20
}
Example options client call in Python
The following is a very simple example of how to use Python to call the options client using RPC and initialize a new option.
import json
import requests
import time

start = int(time.time())
expiry = start

payload = {
   'contract_size': 10,
   'coll_asset': '9a25dca781c13a99720e160379b19f341a02fadc2e3000928a9c7d61d6cd1f00',
   'settle_asset': '0256da63ae717cd3eb7834ce8e05a42bb37eb4b99bb77e2f44eca61b9236b16c',
   'start': start,
   'expiry': expiry,
   'strike_price': 10
}

url = 'http://127.0.0.1:8080/init'
headers = {'content-type': 'application/json'}
response = requests.post(url, data=json.dumps(payload), headers=headers)
json_data = json.loads(response.text)
print(json.dumps(json_data, indent=4))
Example options client call in Node.js
const request = require('request');

const options = {
   url: 'http://127.0.0.1:8080/list',
   json: true,
   body: {}
};

request.post(options, (err, res, body) => {
   if (err) {
       return console.log(err);
   }
   console.log(body);
});
Other RPC language examples
These examples of how to execute remote procedure calls in the following languages can be easily amended to call the options client.
- Python
- Node.js
- C#
- Ruby
- Java
- Go
- Perl
You can adapt the examples by using the details below.
URL:            <http://127.0.0.1:8080>
Method:         The action you wish to execute (for example: list)
Authentication: You do not need to provide a username and password as the
                options client uses cookie based authentication.
An example API and website
By way of example, a fully featured HTTP API has been written in Python using the Flask framework. This allows developers to access the options client via HTTP calls and uses JSON data format to serve requests. This enables you to wrap extra logic and services in an application layer and make it externally accessible. The example website is also written in Python using the Flask framework but any language than can make HTTP API calls (such as JavaScript) can also be used to interact with the API.
We have chosen to use the Python Flask framework because it is a popular and easy to set up web application framework. The example consists of an API that handles all the communication with the server code (i.e. options-cli) and can optionally persist any data that itself is not stored by the options-cli software's own data store. The website component gets and sends data to and from the API and displays it to the user. The sample code requires that the user runs Elements and also the options-cli code itself, which the API communicates with over RPC. The website only communicates to the API. Alternatively, you could merge the two into one code base or just spin up your own solutions. The API and website below are provided as separate parts to demonstrate an application that could be accessed by different, web-enabled means.
The examples are intended to demonstrate how the options client could serve a web-based application and are not intended to serve as a production-ready application.
HTTP API for Options Client
https://github.com/wintercooled/flask_options_example_api
Example Website Using the HTTP API
https://github.com/wintercooled/flask_options_example_website
Liquid options client process overview
The following outlines the steps needed to create and perform actions on a Liquid Options Contract. Some of these steps (for example the issuance of the collateral and settlement assets) need to be done outside of the above example API and website, although all actions that involve the options client itself can be handled through the website/API.
Initializing the option contract
| Component | Action |
|---|---|
| Elements | Initialize Elements if needed: load default wallet, obtain two UTXOs with LBTC in. |
| Elements | Issue a new asset which will be the collateral asset. Example: issueasset 100 0 false |
| Elements | Issue a new asset which will be the settlement asset. Example: issueasset 5000 0 false |
| Elements | Optionally add the assets to the elements.conf config file using the format:assetdir=assetid:name_of_collateral_assetassetdir=assetid:name_of_settlement_assetThis will show the assets within Elements by name and not asset ID. |
| Options Client | Initialize using the initialize command (which requires that the asset issuance transactions have been confirmed). Provide: contract size, expiry, start, strike price, collateral asset, settlement asset). Returns contract_id and issuance tx_id. |
The transaction ID of the newly created option will show two (unknown) assets issued to the same address.
Those are covenant re-issuance tokens and are not held in any wallet, they exist within the covenant itself.
Elements and the covenant tokensThese covenant reissuance tokens show in the Elements QT as assets with ID
00000*and in the transaction details asLBTC. This is an elements UI issue and not an issue with the contract.
Example options initialization transaction
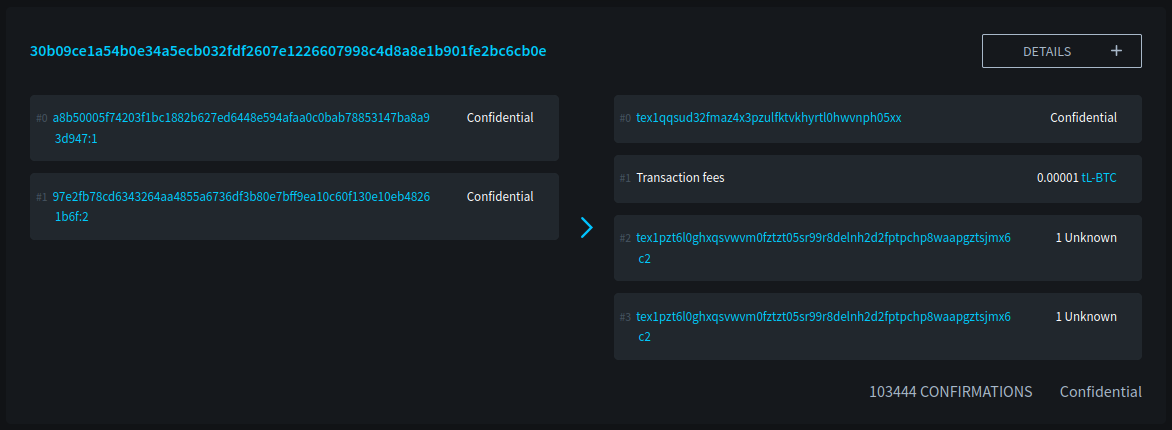
Example initialization transaction on Liquid Testnet
Funding the option contract
Anyone can now fund the contract provided then send the appropriate amount of the required collateral asset. The re-issuance tokens enforce the rules of the contract. After locking in 1 contract size unit of the collateral asset you get 1 ort and 1 crt in return to your Elements wallet. Initialization does not create the ort or crt assets that are used to action a contract (details later), it creates a set of ort and crt reissuance tokens. These assets/tokens are described in more detail in the whitepaper.
| Component | Action |
|---|---|
| Options Client | Fund the option using the fund command (which requires that the initialization transaction has been confirmed. Provide: number of contracts, contract id. |
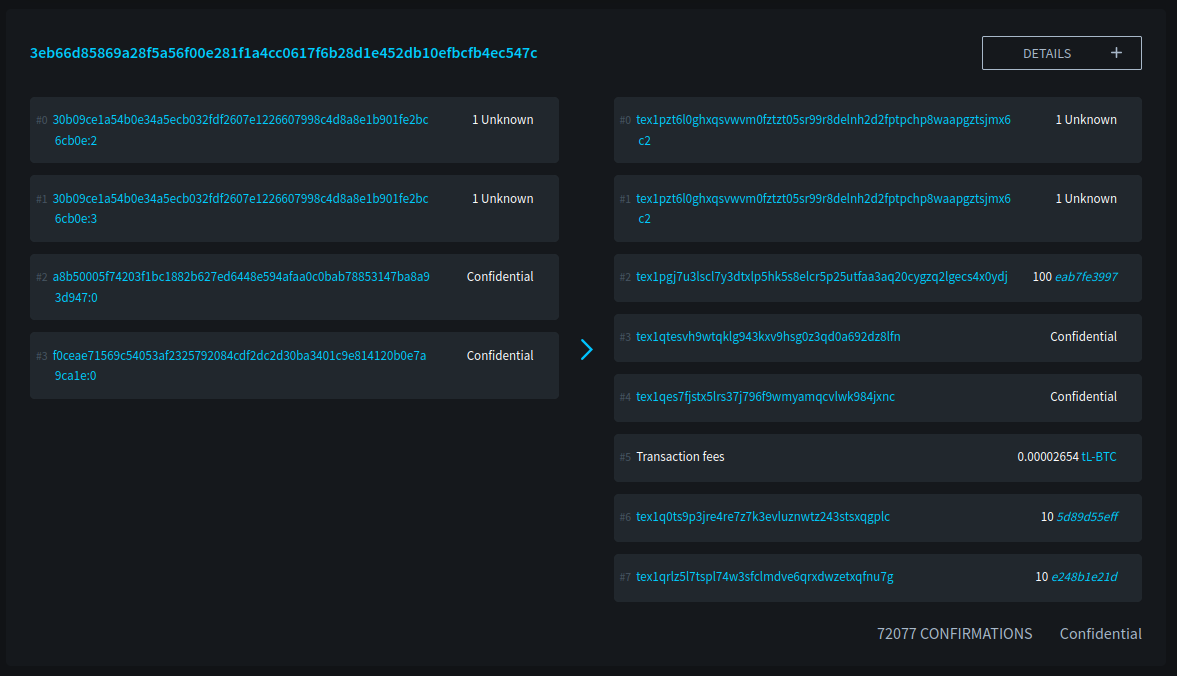
Example funding transaction on Liquid Testnet
The getbalance command within Elements will now show the asset balances.
Exercising one contract requires 1 ort.
Canceling one contract requires 1 ort and 1 crt.
Claiming settlement from already exercised covenant requires 1 crt.
Claiming collateral after expiry requires 1 crt.
Option contract actions
Once funded, the options contract can be funded further by any party who imports the contract into their options client or, depending on what tokens are held, the following actions can be carried out.
| Component | Action |
|---|---|
| Options Client | Cancel a number of contracts using the cancel command. Provide: number to cancel, contract id. |
| Options Client | Expire a number of contracts using the expire command. Provide: number to expire, contract id. |
| Options Client | Exercise a number of contracts using the exercise command. Provide: number to exercise, contract id. |
| Options Client | Settle a number of contracts using the settle command. Provide: number to settle, contract id. |
Importing and exporting contracts
You can export a contract's definition using the options client. At a high level, this is the data that defines an options contract. Other users of the options client can then import this data to view and action it. You can also remove an option from the option client's database. It can be handy to remove entries that the user is no longer interested in, or for removing old expired contracts.
Updated 8 months ago